罗列几个小目标:1. 理解MCP概念 2. 写一个简单的mcp项目 3. 参考网上的mcp项目,结合以前安全方面的agent,参考能否延展到MCP中 4. 思考MCP的安全性问题,并查找现有的MCP项目中的安全问题 5. 写一个MCP安全性检测工具
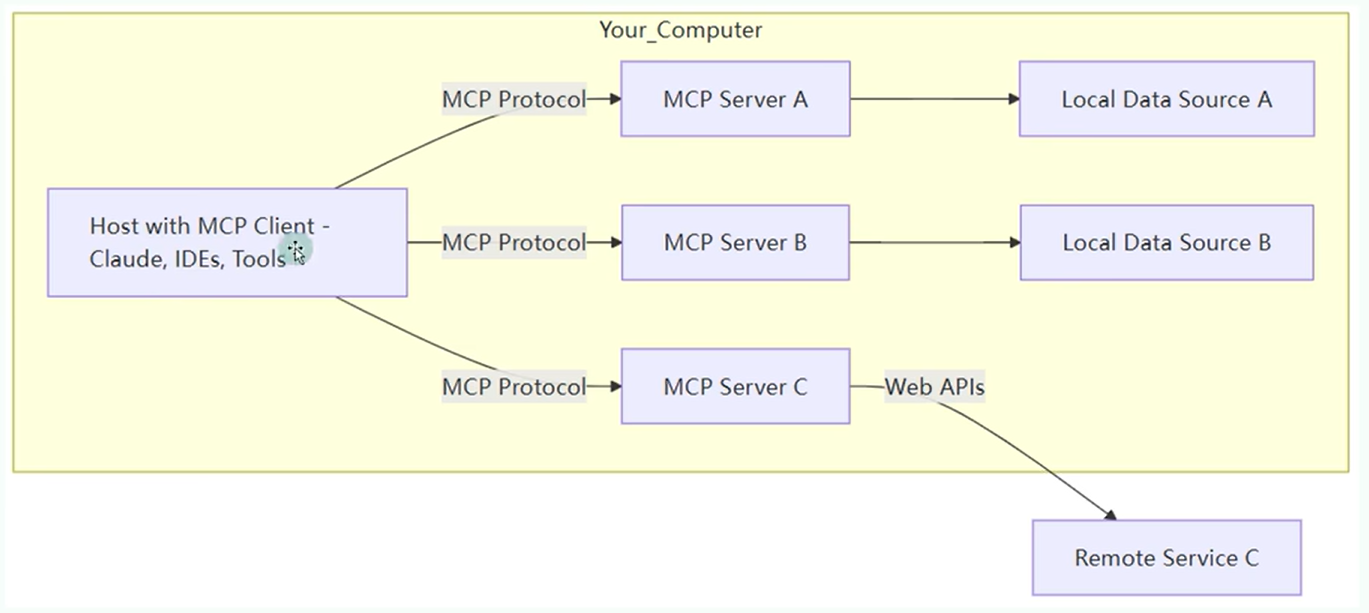
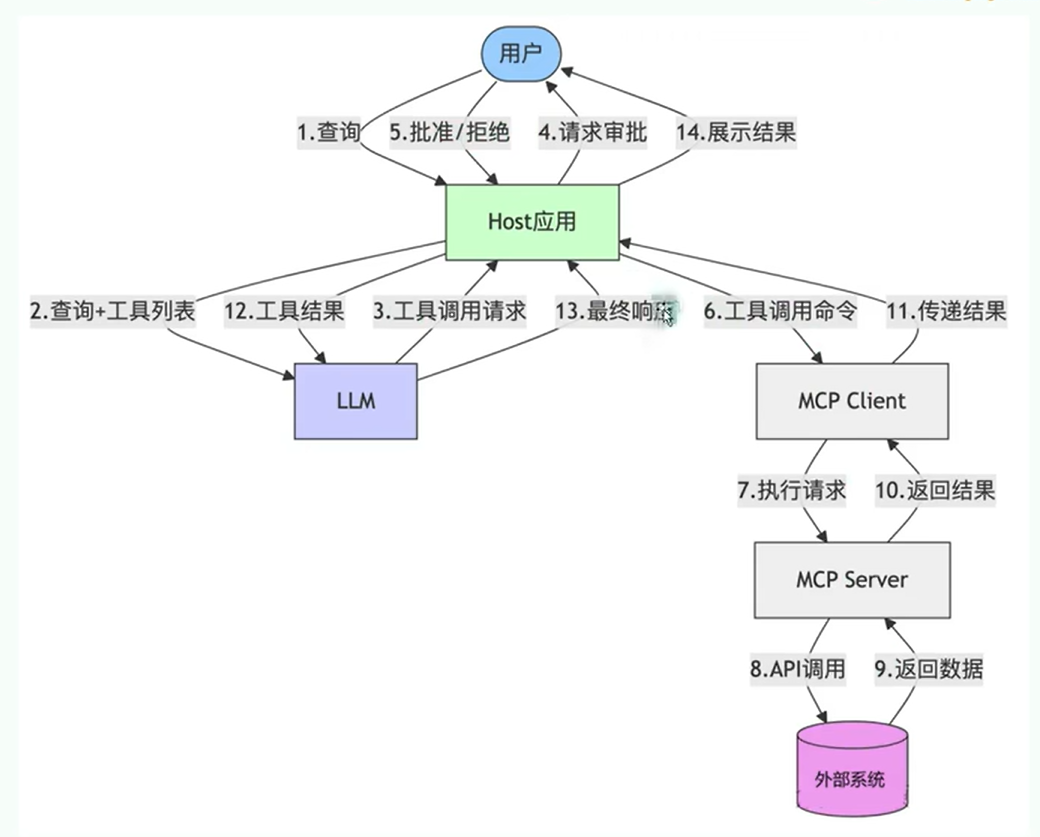
几个概念 MCP 的核心是 “客户端 - 服务器” 架构,其中 MCP 客户端主机可以连接到多个服务器。客户端主机是指希望通过 MCP 访问数据的程序,比如 Claude Desktop、IDE 或 AI 工具。
MCP Client <font style="color:rgb(63, 63, 63);">MCP Client</font>,比如cursor, 它是 MCP 架构中的关键组件,主要负责和 MCP 服务器建立连接并进行通信。它能自动匹配服务器的协议版本,确认可用功能,并负责数据传输和 JSON-RPC 交互。主要 用于调用 远程 或者 本地 资源,远程:高德地图,本地:数据库、表等
主要负责:
接收来自LLM的请求
将请求转发到相应的MCP server
将MCP server的结果返回给LLM
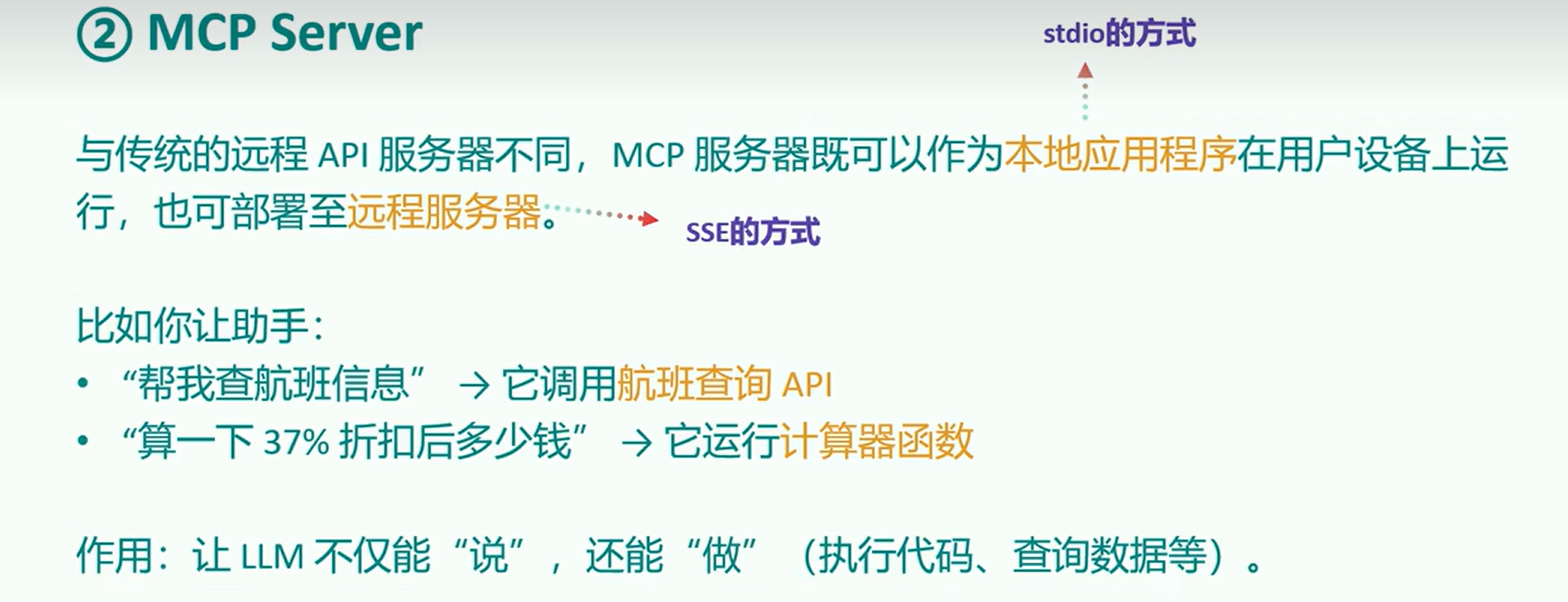
MCP Server MCP 服务器是整个 MCP 架构的核心部分,主要用来为客户端提供各种工具、资源和功能支持。它负责处理客户端的请求,包括解析协议、提供工具、管理资源以及处理各种交互信息。
他的本质:是运行在电脑上的一个nodejs或python程序。
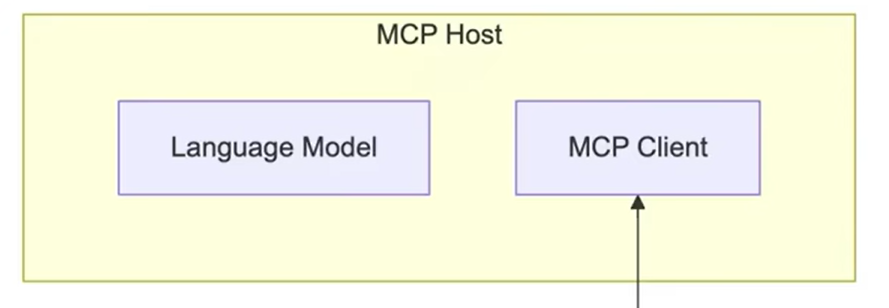
MCP Host MCP Host:作为运行MCP的主应用程序,为用户提供与LLM交互的接口,同时可以集成MCP Client和MCP Server
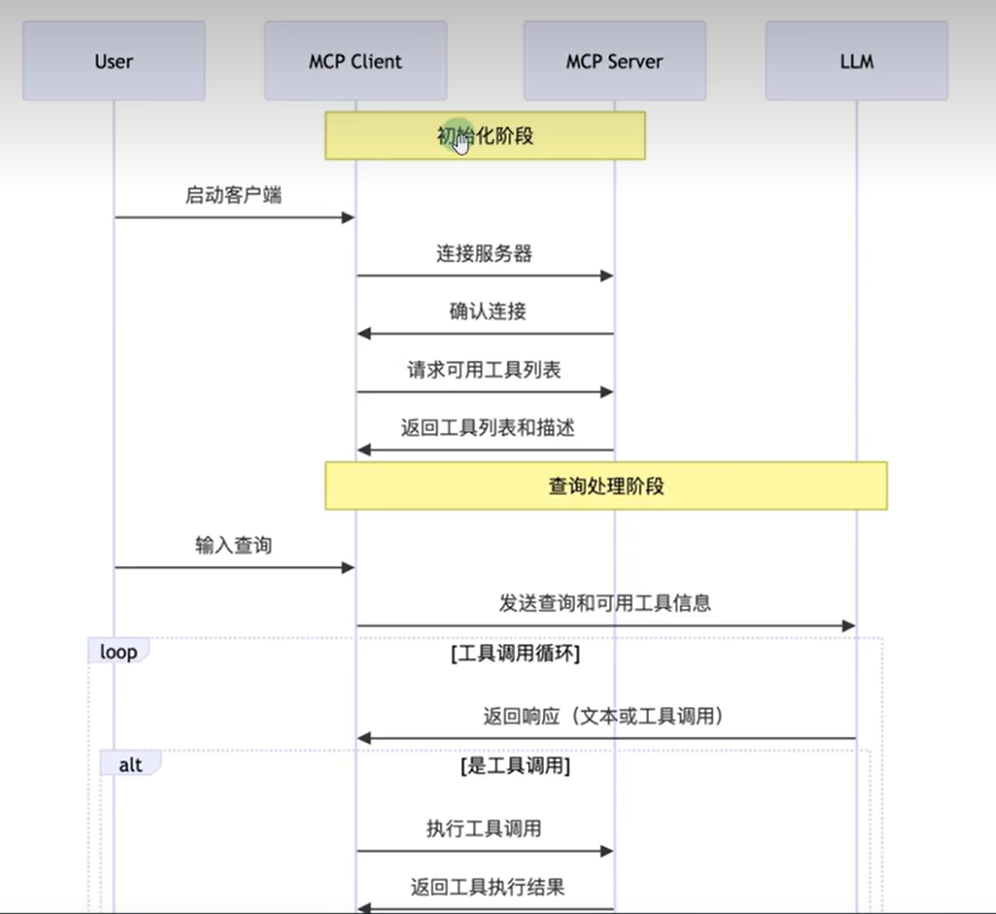
工作流程 借用别人的图
手动开发MCP(C/S) 为了更好的学习MCP安全,首先要学习MCP是如何构建的,下面就尝试构建一个本地智能舆情分析系统,通过nlp与多工具协作,实现用户查询意图的自动理解、新闻检索、情绪分析、结构化输出与邮件推送。
环境配置 uv安装 1 conda install uv -c conda-forge
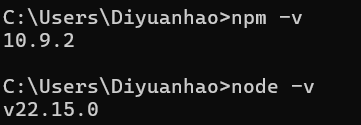
NPM安装 https://nodejs.org/zh-cn 下载后安装,并且配置好环境变量
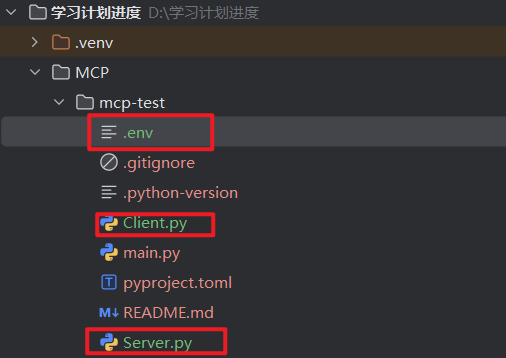
在新环境中创建client.py、server.py,.env三个文件
.env:放置LLM的一些配置参数
1
2
3
BASE_URL = "https://dashscope.aliyuncs.com/compatible-mode/v1" MODEL = "qwen-plus" DASHSCOPE_API_KEY="sk-2daecea8ef8a4ae8ab5e4c449af4cfaf"
https://serper.dev/signup 注册获取key
并且获取邮箱的授权码,补充填写env文件
1
2
3
4
5
6
7
8
9
BASE_URL="https://dashscope.aliyuncs.com/compatible-mode/v1" MODEL=qwen2.5-vl-32b-instruct DASHSCOPE_API_KEY="sk-a3dd757ba0064ba8865796f81e2bba23" SERPER_API_KEY="49c896b82bde56fc0c3945a7c0ff432ea333473f" SMTP_SERVER=smtp.qq.com SMTP_PORT=465 EMAIL_USER=1254253740@qq.com EMAIL_PASS=nscglpmrelkdbaaa
下面是Client和Server的代码,有时间我会补充两个代码里面的细节,展示如何一步一步构建的
Client.py 1 2 3 4 5 6 7 8 9 10 11 12 13 14 15 16 17 18 19 20 21 22 23 24 25 26 27 28 29 30 31 32 33 34 35 36 37 38 39 40 41 42 43 44 45 46 47 48 49 50 51 52 53 54 55 56 57 58 59 60 61 62 63 64 65 66 67 68 69 70 71 72 73 74 75 76 77 78 79 80 81 82 83 84 85 86 87 88 89 90 91 92 93 94 95 96 97 98 99 100 101 102 103 104 105 106 107 108 109 110 111 112 113 114 115 116 117 118 119 120 121 122 123 124 125 126 127 128 129 130 131 132 133 134 135 136 137 138 139 140 141 142 143 144 145 146 147 148 149 150 151 152 153 154 155 156 157 158 159 160 161 162 163 164 165 166 167 168 169 170 171 172 173 174 175 176 177 178 179 180 181 182 183 184 185 186 187 188 189 190 191 192 193 194 195 196 197 198 199 200 201 202 203 204 205 206 207 208 209 210 211 212 213 214 215 216 217 218 219 220 221 222 223 224 225 226 227 228 229 230 231 232 233 234 235 236 237 import asyncioimport osimport jsonfrom typing import Optional , List from contextlib import AsyncExitStackfrom datetime import datetimeimport refrom openai import OpenAIfrom dotenv import load_dotenvfrom mcp import ClientSession, StdioServerParametersfrom mcp.client.stdio import stdio_clientload_dotenv() class MCPClient : def __init__ (self ): self.exit_stack = AsyncExitStack() self.openai_api_key = os.getenv("DASHSCOPE_API_KEY" ) self.base_url = os.getenv("BASE_URL" ) self.model = os.getenv("MODEL" ) if not self.openai_api_key: raise ValueError("❌ 未找到 OpenAI API Key,请在 .env 文件中设置 DASHSCOPE_API_KEY" ) self.client = OpenAI(api_key=self.openai_api_key, base_url=self.base_url) self.session: Optional [ClientSession] = None async def connect_to_server (self, server_script_path: str ): is_python = server_script_path.endswith('.py' ) is_js = server_script_path.endswith('.js' ) if not (is_python or is_js): raise ValueError("服务器脚本必须是 .py 或 .js 文件" ) command = "python" if is_python else "node" server_params = StdioServerParameters(command=command, args=[server_script_path], env=None ) stdio_transport = await self.exit_stack.enter_async_context(stdio_client(server_params)) self.stdio, self.write = stdio_transport self.session = await self.exit_stack.enter_async_context(ClientSession(self.stdio, self.write)) await self.session.initialize() response = await self.session.list_tools() tools = response.tools print ("\n已连接到服务器,支持以下工具:" , [tool.name for tool in tools]) async def process_query (self, query: str ) -> str : messages = [{"role" : "user" , "content" : query}] response = await self.session.list_tools() available_tools = [ { "type" : "function" , "function" : { "name" : tool.name, "description" : tool.description, "input_schema" : tool.inputSchema } } for tool in response.tools ] keyword_match = re.search(r'(关于|分析|查询|搜索|查看)([^的\s,。、?\n]+)' , query) keyword = keyword_match.group(2 ) if keyword_match else "分析对象" safe_keyword = re.sub(r'[\\/:*?"<>|]' , '' , keyword)[:20 ] timestamp = datetime.now().strftime('%Y%m%d_%H%M%S' ) md_filename = f"sentiment_{safe_keyword} _{timestamp} .md" md_path = os.path.join("./sentiment_reports" , md_filename) query = query.strip() + f" [md_filename={md_filename} ] [md_path={md_path} ]" messages = [{"role" : "user" , "content" : query}] tool_plan = await self.plan_tool_usage(query, available_tools) tool_outputs = {} messages = [{"role" : "user" , "content" : query}] for step in tool_plan: tool_name = step["name" ] tool_args = step["arguments" ] for key, val in tool_args.items(): if isinstance (val, str ) and val.startswith("{{" ) and val.endswith("}}" ): ref_key = val.strip("{} " ) resolved_val = tool_outputs.get(ref_key, val) tool_args[key] = resolved_val if tool_name == "analyze_sentiment" and "filename" not in tool_args: tool_args["filename" ] = md_filename if tool_name == "send_email_with_attachment" and "attachment_path" not in tool_args: tool_args["attachment_path" ] = md_path result = await self.session.call_tool(tool_name, tool_args) tool_outputs[tool_name] = result.content[0 ].text messages.append({ "role" : "tool" , "tool_call_id" : tool_name, "content" : result.content[0 ].text }) final_response = self.client.chat.completions.create( model=self.model, messages=messages ) final_output = final_response.choices[0 ].message.content def clean_filename (text: str ) -> str : text = text.strip() text = re.sub(r'[\\/:*?\"<>|]' , '' , text) return text[:50 ] safe_filename = clean_filename(query) timestamp = datetime.now().strftime('%Y%m%d_%H%M%S' ) filename = f"{safe_filename} _{timestamp} .txt" output_dir = "./llm_outputs" os.makedirs(output_dir, exist_ok=True ) file_path = os.path.join(output_dir, filename) with open (file_path, "w" , encoding="utf-8" ) as f: f.write(f"🗣 用户提问:{query} \n\n" ) f.write(f"🤖 模型回复:\n{final_output} \n" ) print (f"📄 对话记录已保存为:{file_path} " ) return final_output async def chat_loop (self ): print ("\n🤖 MCP 客户端已启动!输入 'quit' 退出" ) while True : try : query = input ("\n你: " ).strip() if query.lower() == 'quit' : break response = await self.process_query(query) print (f"\n🤖 AI: {response} " ) except Exception as e: print (f"\n⚠️ 发生错误: {str (e)} " ) async def plan_tool_usage (self, query: str , tools: List [dict ] ) -> List [dict ]: print ("\n📤 提交给大模型的工具定义:" ) print (json.dumps(tools, ensure_ascii=False , indent=2 )) tool_list_text = "\n" .join([ f"- {tool['function' ]['name' ]} : {tool['function' ]['description' ]} " for tool in tools ]) system_prompt = { "role" : "system" , "content" : ( "你是一个智能任务规划助手,用户会给出一句自然语言请求。\n" "你只能从以下工具中选择(严格使用工具名称):\n" f"{tool_list_text} \n" "如果多个工具需要串联,后续步骤中可以使用 {{上一步工具名}} 占位。\n" "返回格式:JSON 数组,每个对象包含 name 和 arguments 字段。\n" "不要返回自然语言,不要使用未列出的工具名。" ) } planning_messages = [ system_prompt, {"role" : "user" , "content" : query} ] response = self.client.chat.completions.create( model=self.model, messages=planning_messages, tools=tools, tool_choice="none" ) content = response.choices[0 ].message.content.strip() match = re.search(r"```(?:json)?\\s*([\s\S]+?)\\s*```" , content) if match : json_text = match .group(1 ) else : json_text = content try : plan = json.loads(json_text) return plan if isinstance (plan, list ) else [] except Exception as e: print (f"❌ 工具调用链规划失败: {e} \n原始返回: {content} " ) return [] async def cleanup (self ): await self.exit_stack.aclose() async def main (): server_script_path = "./server.py" client = MCPClient() try : await client.connect_to_server(server_script_path) await client.chat_loop() finally : await client.cleanup() if __name__ == "__main__" : asyncio.run(main())
Server.py 1 2 3 4 5 6 7 8 9 10 11 12 13 14 15 16 17 18 19 20 21 22 23 24 25 26 27 28 29 30 31 32 33 34 35 36 37 38 39 40 41 42 43 44 45 46 47 48 49 50 51 52 53 54 55 56 57 58 59 60 61 62 63 64 65 66 67 68 69 70 71 72 73 74 75 76 77 78 79 80 81 82 83 84 85 86 87 88 89 90 91 92 93 94 95 96 97 98 99 100 101 102 103 104 105 106 107 108 109 110 111 112 113 114 115 116 117 118 119 120 121 122 123 124 125 126 127 128 129 130 131 132 133 134 135 136 137 138 139 140 141 142 143 144 145 146 147 148 149 150 151 152 153 154 155 156 157 158 159 160 161 162 163 164 165 166 167 168 169 170 171 172 173 174 175 176 177 178 179 180 181 182 183 184 185 186 187 188 189 190 import osimport jsonimport smtplibfrom datetime import datetimefrom email.message import EmailMessageimport httpxfrom mcp.server.fastmcp import FastMCPfrom dotenv import load_dotenvfrom openai import OpenAIload_dotenv() mcp = FastMCP("NewsServer" ) @mcp.tool() async def search_google_news (keyword: str ) -> str : """ 使用 Serper API(Google Search 封装)根据关键词搜索新闻内容,返回前5条标题、描述和链接。 参数: keyword (str): 关键词,如 "小米汽车" 返回: str: JSON 字符串,包含新闻标题、描述、链接 """ api_key = os.getenv("SERPER_API_KEY" ) if not api_key: return "❌ 未配置 SERPER_API_KEY,请在 .env 文件中设置" url = "https://google.serper.dev/news" headers = { "X-API-KEY" : api_key, "Content-Type" : "application/json" } payload = {"q" : keyword} async with httpx.AsyncClient() as client: response = await client.post(url, headers=headers, json=payload) data = response.json() if "news" not in data: return "❌ 未获取到搜索结果" articles = [ { "title" : item.get("title" ), "desc" : item.get("snippet" ), "url" : item.get("link" ) } for item in data["news" ][:5 ] ] output_dir = "./google_news" os.makedirs(output_dir, exist_ok=True ) filename = f"google_news_{datetime.now().strftime('%Y%m%d_%H%M%S' )} .json" file_path = os.path.join(output_dir, filename) with open (file_path, "w" , encoding="utf-8" ) as f: json.dump(articles, f, ensure_ascii=False , indent=2 ) return ( f"✅ 已获取与 [{keyword} ] 相关的前5条 Google 新闻:\n" f"{json.dumps(articles, ensure_ascii=False , indent=2 )} \n" f"📄 已保存到:{file_path} " ) @mcp.tool() async def analyze_sentiment (text: str , filename: str ) -> str : """ 对传入的一段文本内容进行情感分析,并保存为指定名称的 Markdown 文件。 参数: text (str): 新闻描述或文本内容 filename (str): 保存的 Markdown 文件名(不含路径) 返回: str: 完整文件路径(用于邮件发送) """ openai_key = os.getenv("DASHSCOPE_API_KEY" ) model = os.getenv("MODEL" ) client = OpenAI(api_key=openai_key, base_url=os.getenv("BASE_URL" )) prompt = f"请对以下新闻内容进行情绪倾向分析,并说明原因:\n\n{text} " response = client.chat.completions.create( model=model, messages=[{"role" : "user" , "content" : prompt}] ) result = response.choices[0 ].message.content.strip() markdown = f"""# 舆情分析报告 **分析时间:** {datetime.now().strftime('%Y-%m-%d %H:%M:%S' )} --- ## 📥 原始文本 {text} --- ## 📊 分析结果 {result} """ output_dir = "./sentiment_reports" os.makedirs(output_dir, exist_ok=True ) if not filename: filename = f"sentiment_{datetime.now().strftime('%Y%m%d_%H%M%S' )} .md" file_path = os.path.join(output_dir, filename) with open (file_path, "w" , encoding="utf-8" ) as f: f.write(markdown) return file_path @mcp.tool() async def send_email_with_attachment (to: str , subject: str , body: str , filename: str ) -> str : """ 发送带附件的邮件。 参数: to: 收件人邮箱地址 subject: 邮件标题 body: 邮件正文 filename (str): 保存的 Markdown 文件名(不含路径) 返回: 邮件发送状态说明 """ smtp_server = os.getenv("SMTP_SERVER" ) smtp_port = int (os.getenv("SMTP_PORT" , 465 )) sender_email = os.getenv("EMAIL_USER" ) sender_pass = os.getenv("EMAIL_PASS" ) full_path = os.path.abspath(os.path.join("./sentiment_reports" , filename)) if not os.path.exists(full_path): return f"❌ 附件路径无效,未找到文件: {full_path} " msg = EmailMessage() msg["Subject" ] = subject msg["From" ] = sender_email msg["To" ] = to msg.set_content(body) try : with open (full_path, "rb" ) as f: file_data = f.read() file_name = os.path.basename(full_path) msg.add_attachment(file_data, maintype="application" , subtype="octet-stream" , filename=file_name) except Exception as e: return f"❌ 附件读取失败: {str (e)} " try : with smtplib.SMTP_SSL(smtp_server, smtp_port) as server: server.login(sender_email, sender_pass) server.send_message(msg) return f"✅ 邮件已成功发送给 {to} ,附件路径: {full_path} " except Exception as e: return f"❌ 邮件发送失败: {str (e)} " if __name__ == "__main__" : mcp.run(transport='stdio' )
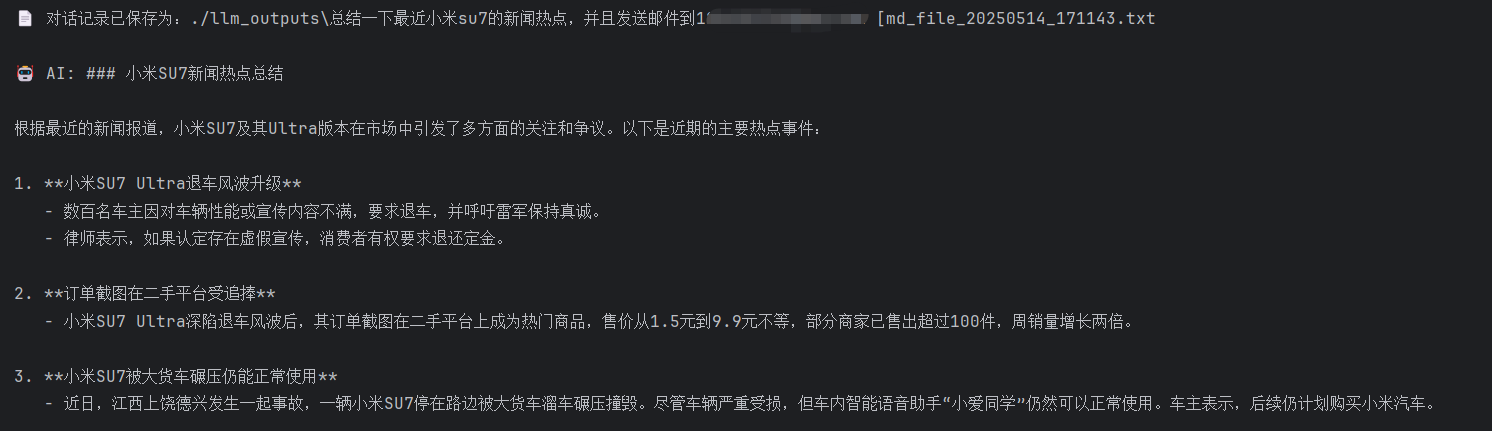
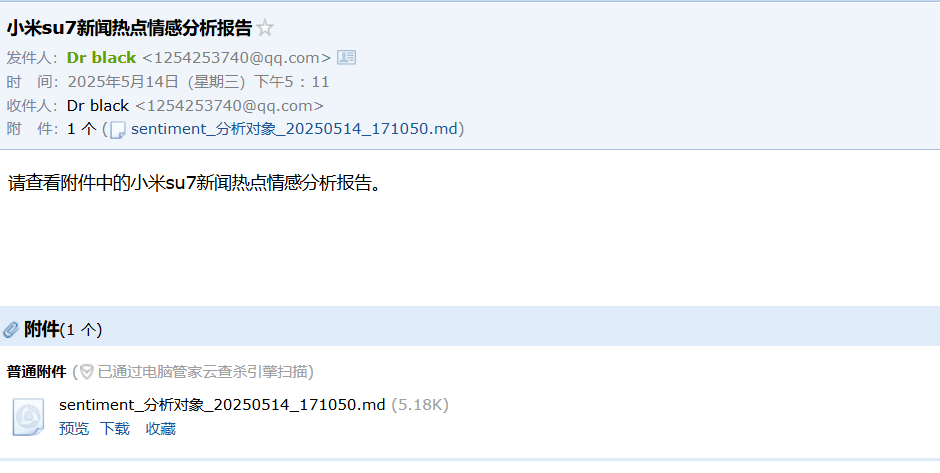
首先运行Server.py,然后再运行Client.py文件。
输入对小米Su7的新闻热点总结,然后让模型进行情感分析后发送邮件到邮箱
如何使用现有的MCP 任务描述 先准备好自己的任务描述
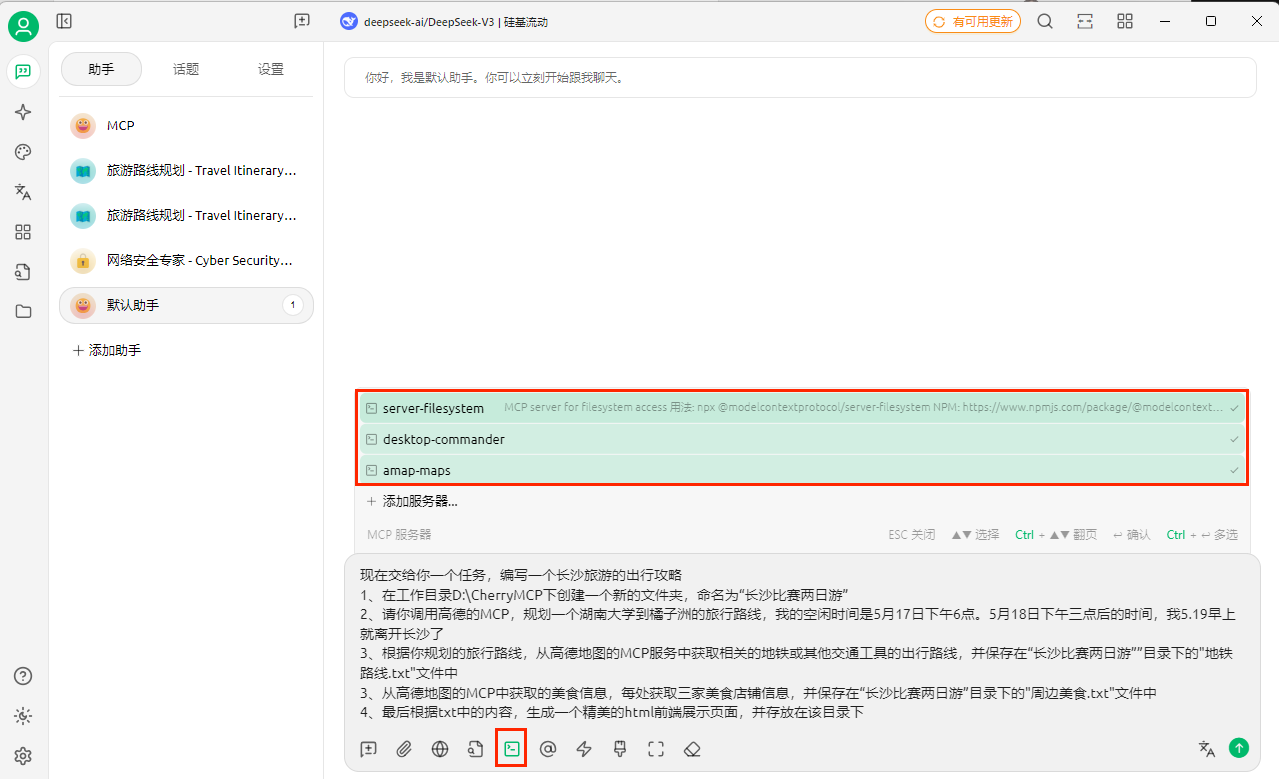
1
2
3
4
5
6
现在交给你一个任务,编写一个长沙旅游的出行攻略 1、在工作目录D:\CherryMCP下创建一个新的文件夹,命名为“长沙比赛两日游” 2、请你调用高德的MCP,规划一个湖南大学到橘子洲的旅行路线,我的空闲时间是5月17日下午6点。5月18日下午三点后的时间,我5.19早上就离开长沙了 3、根据你规划的旅行路线,从高德地图的MCP服务中获取相关的地铁或其他交通工具的出行路线,并保存在“长沙比赛两日游””目录下的"地铁路线.txt"文件中 3、从高德地图的MCP中获取的美食信息,每处获取三家美食店铺信息,并保存在“长沙比赛两日游”目录下的"周边美食.txt"文件中 4、最后根据txt中的内容,生成一个精美的html前端展示页面,并存放在该目录下
根据任务的描述去选择MCP
配置MCPserver
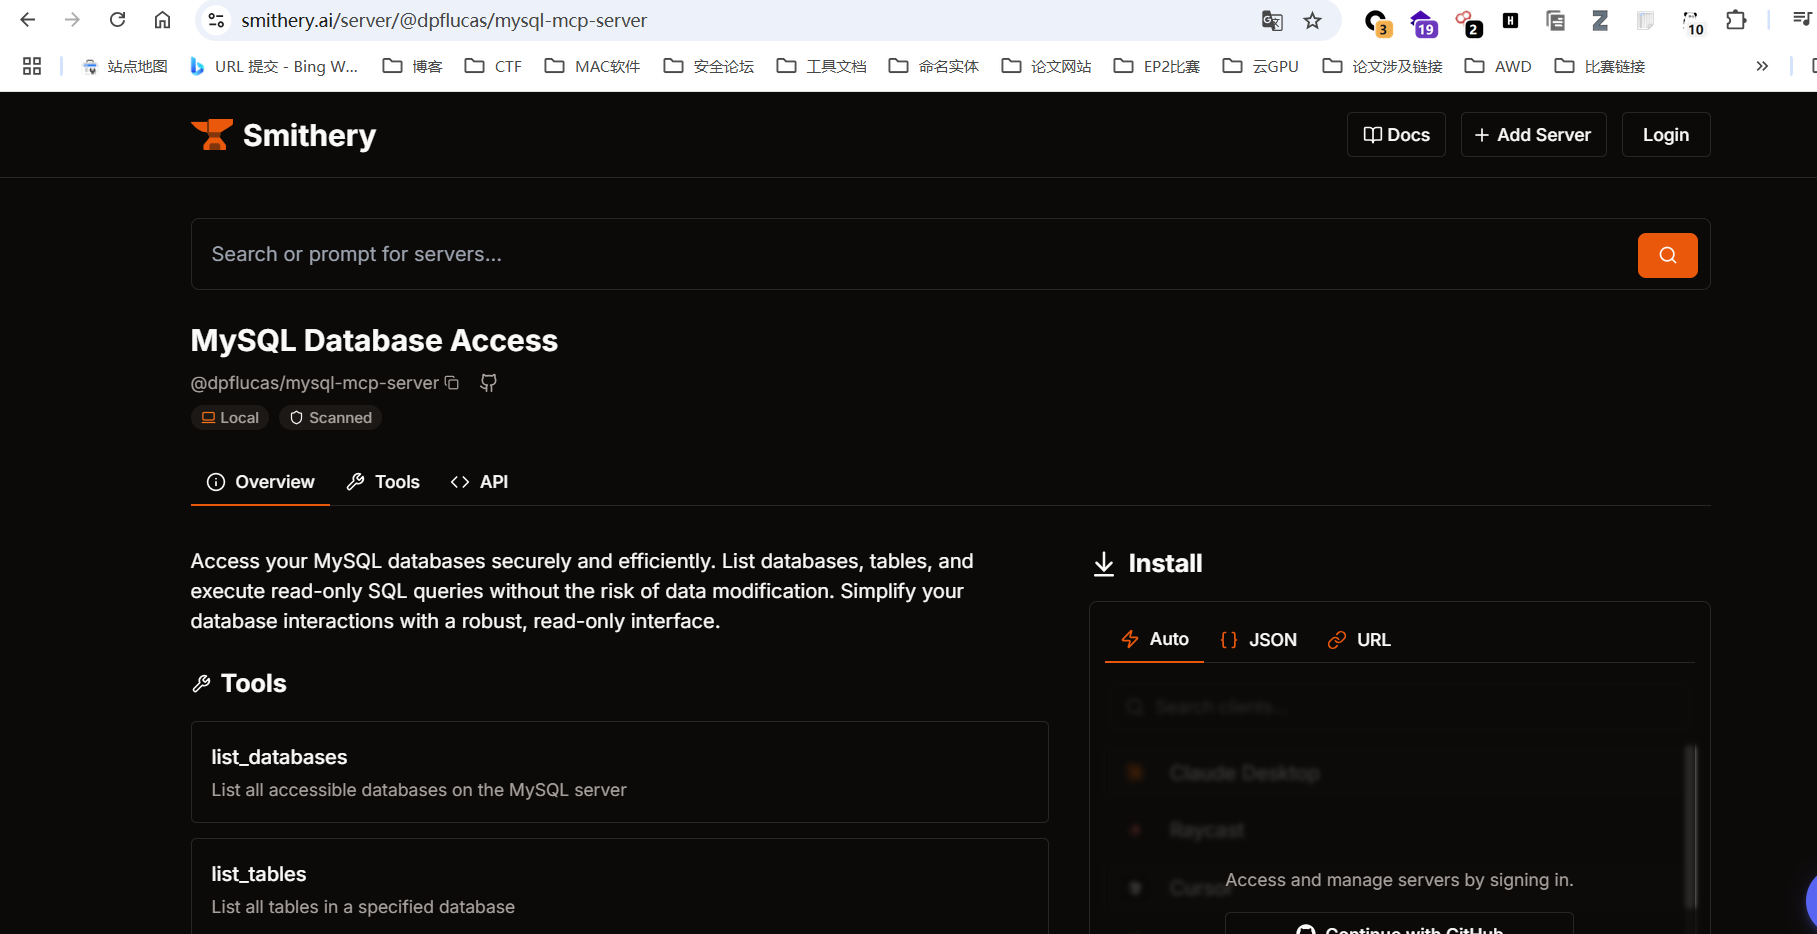
首先需要配置mysql server的服务
配置smithery这些密钥
打开https://smithery.ai/ ,搜索mysql服务,找到一个热度比较高的(可用性更强)
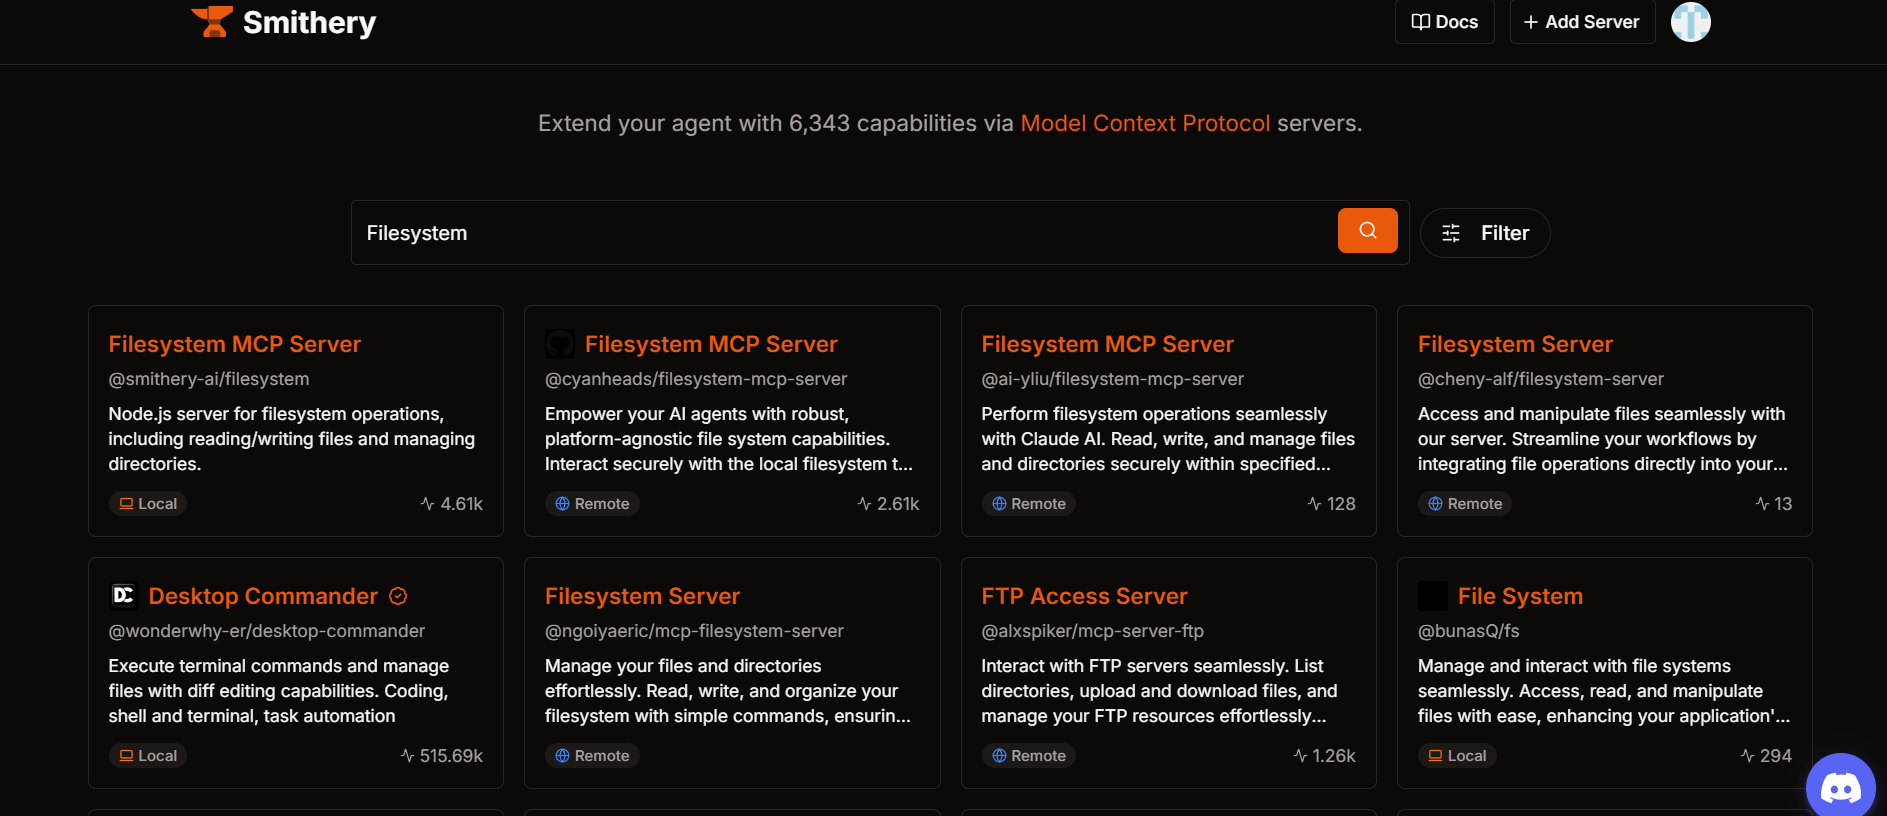
文件操作MCP 可以在https://smithery.ai/ 上找filesystem的mcp,然后将json配置后即可。(这里坑比较多)
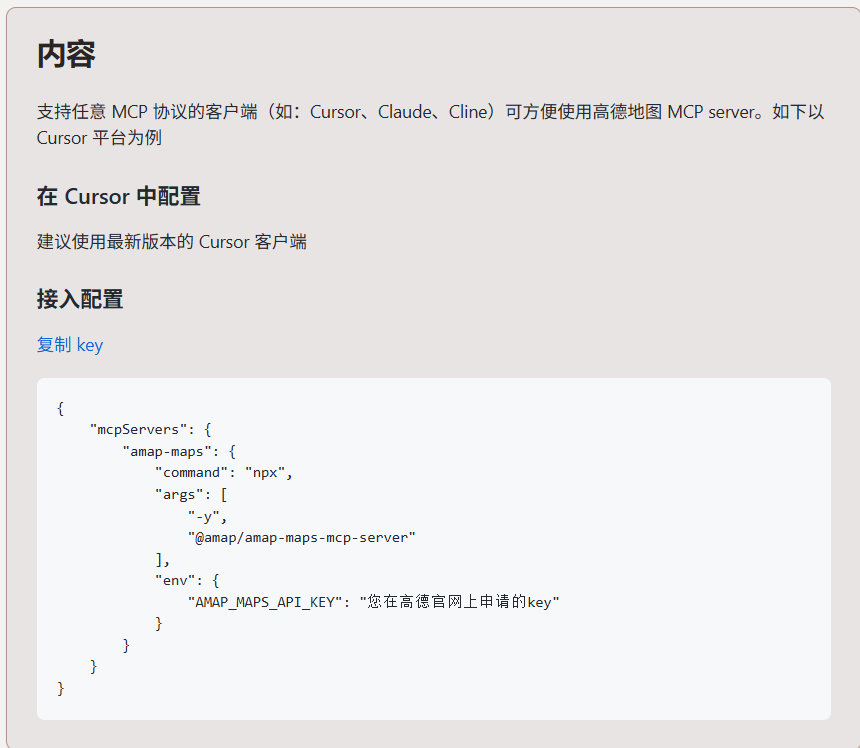
高德地图MCP https://mcp.so/zh 找到高德的mcp
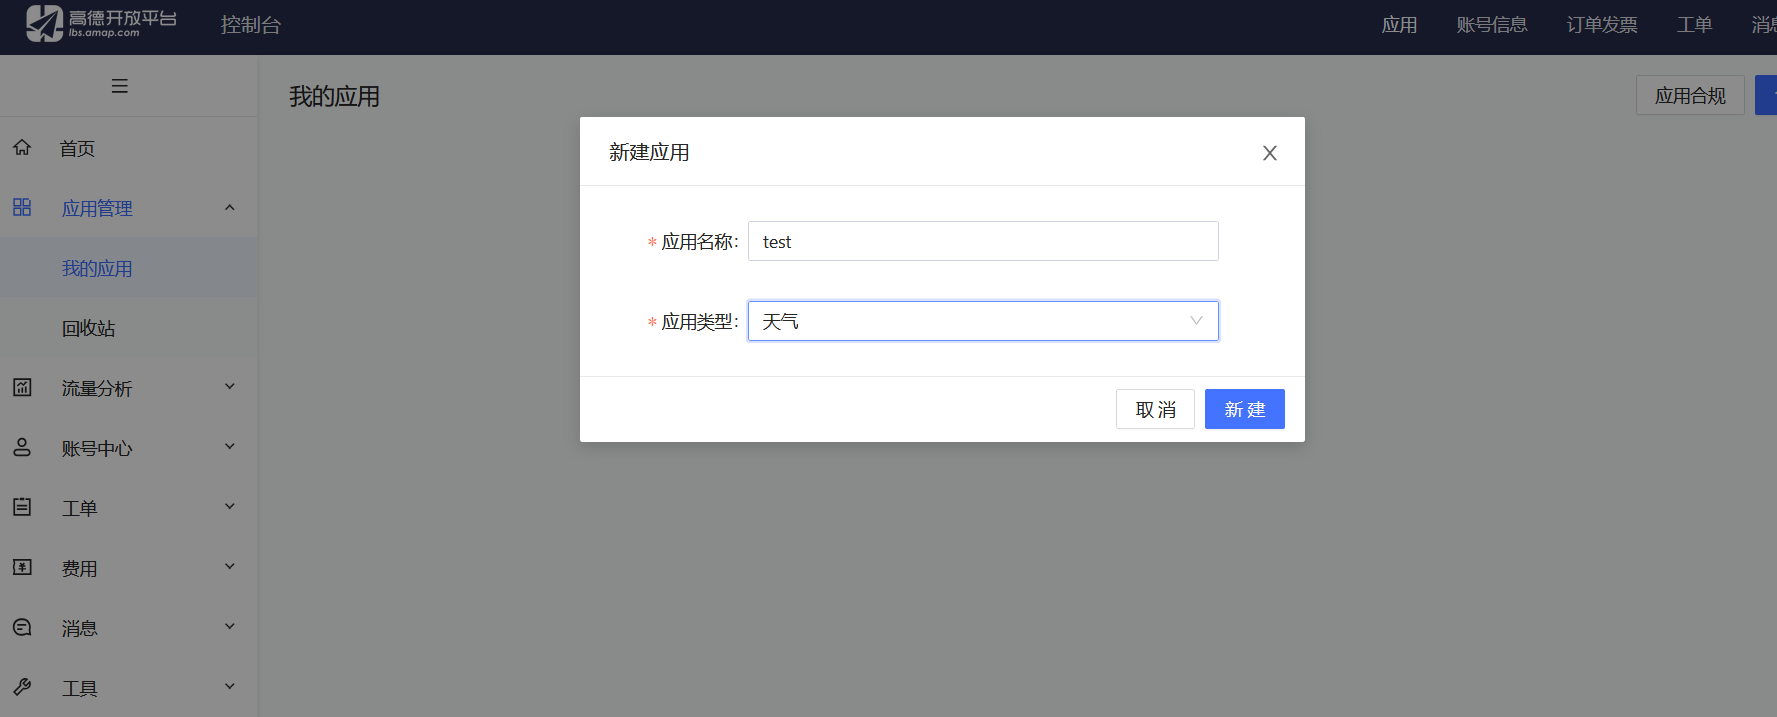
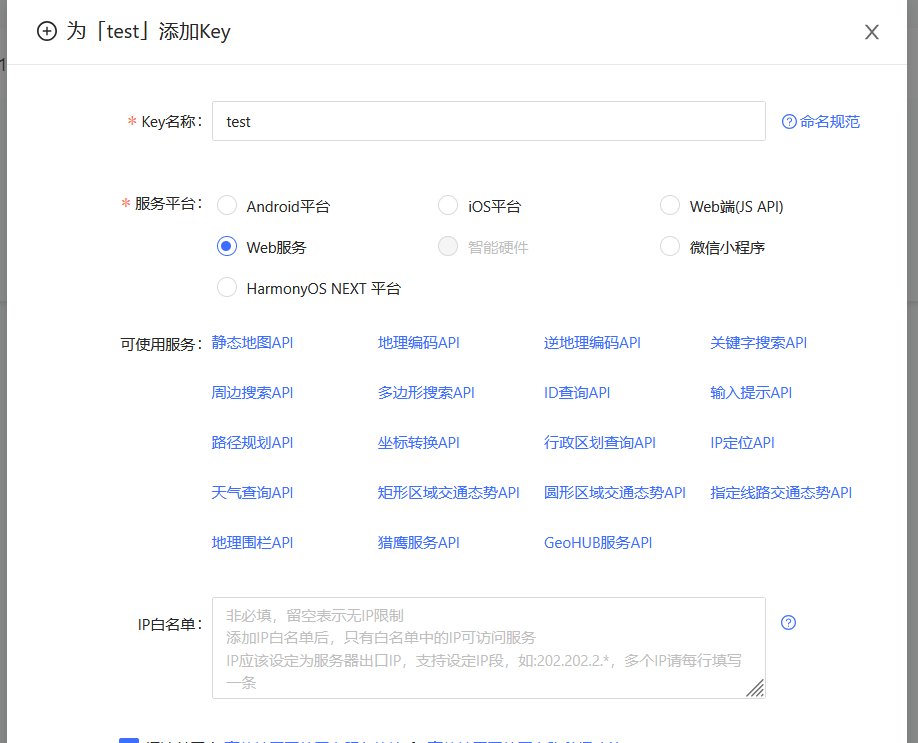
高德地图key申请 https://console.amap.com/
1
2
3
4
5
6
7
8
9
10
11
12
13
"amap-maps": { "isActive": true, "command": "npx", "args": [ "-y", "@amap/amap-maps-mcp-server" ], "env": { "AMAP_MAPS_API_KEY": "58f81d5237c1b7911ce21dbeaad988aa" }, "name": "amap-maps" } }
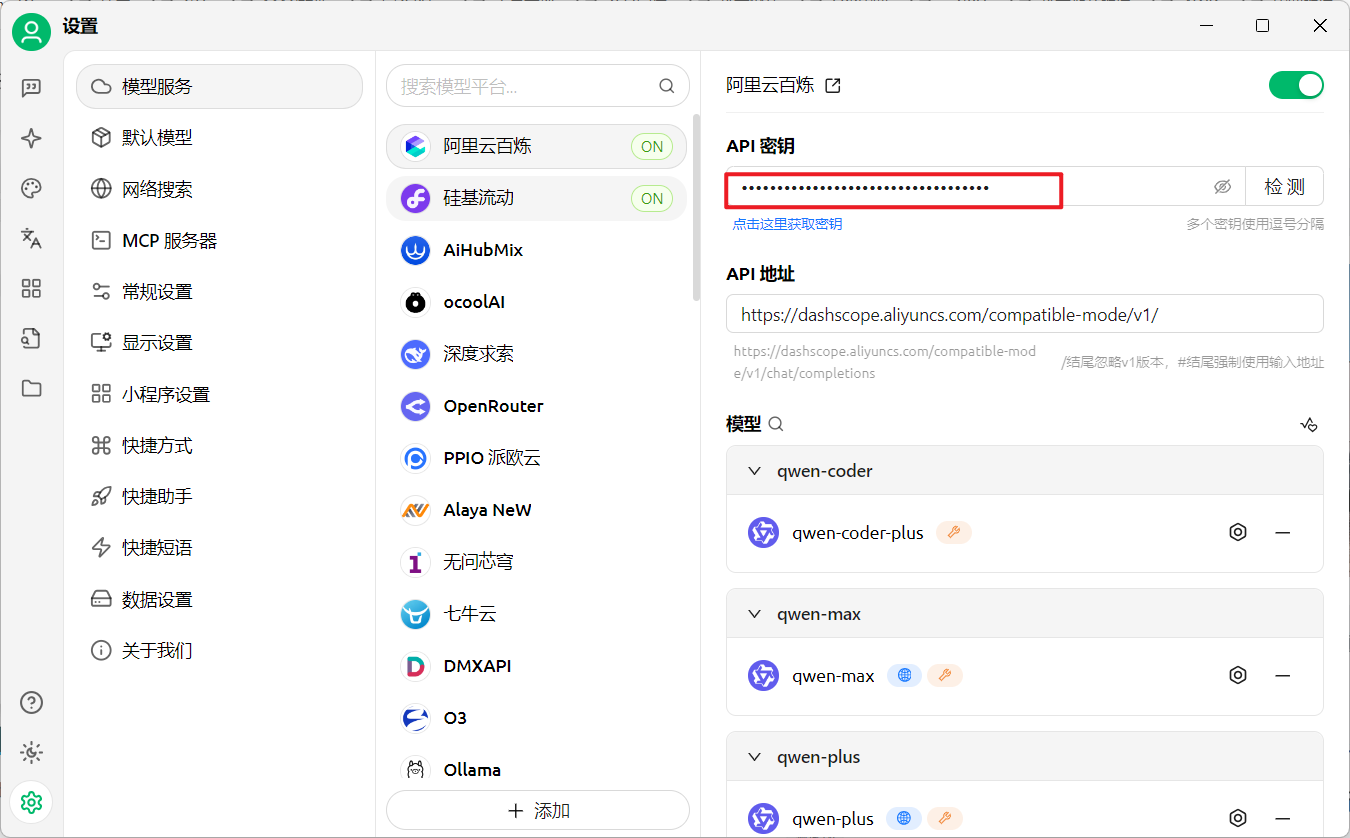
Cherry Studio完成任务 首先配置好对应AI平台的API密钥
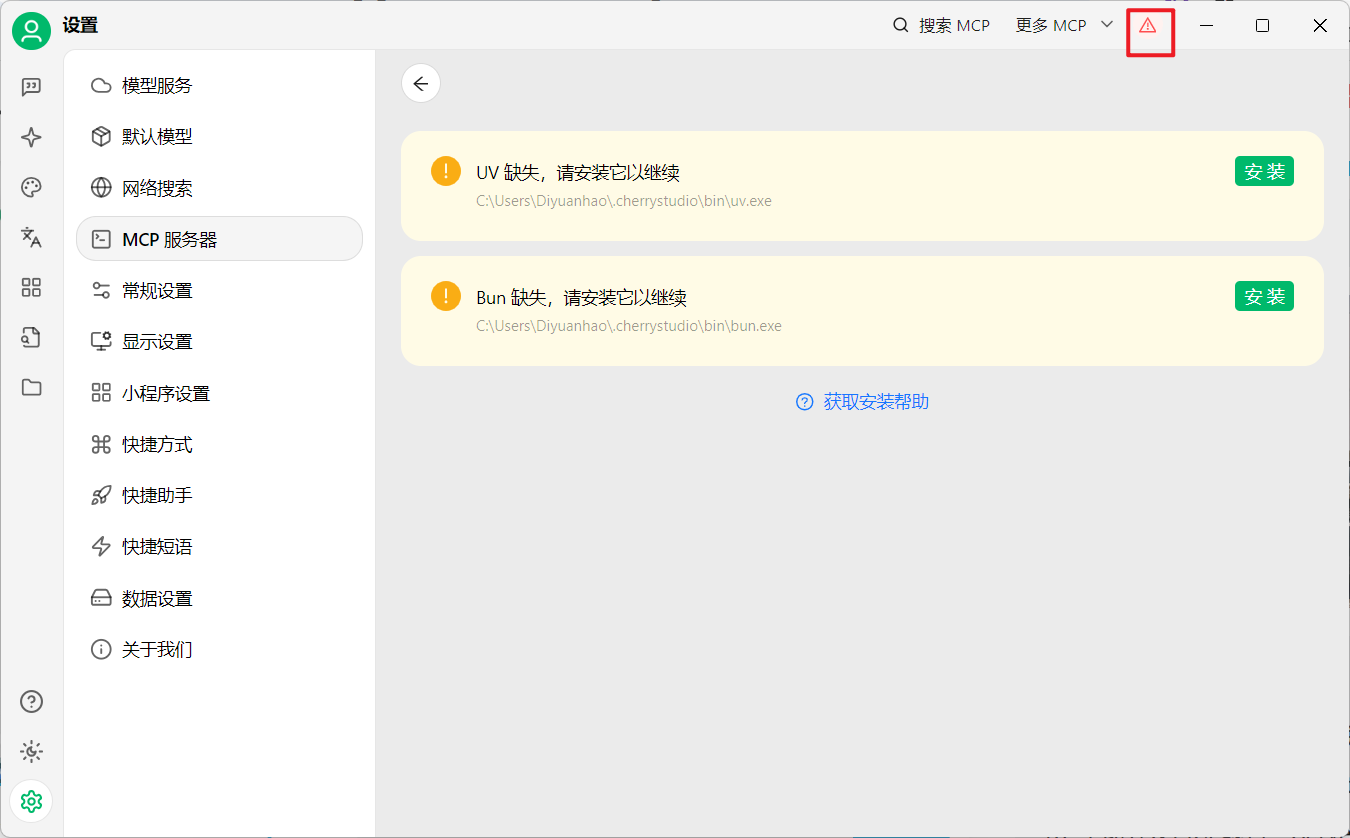
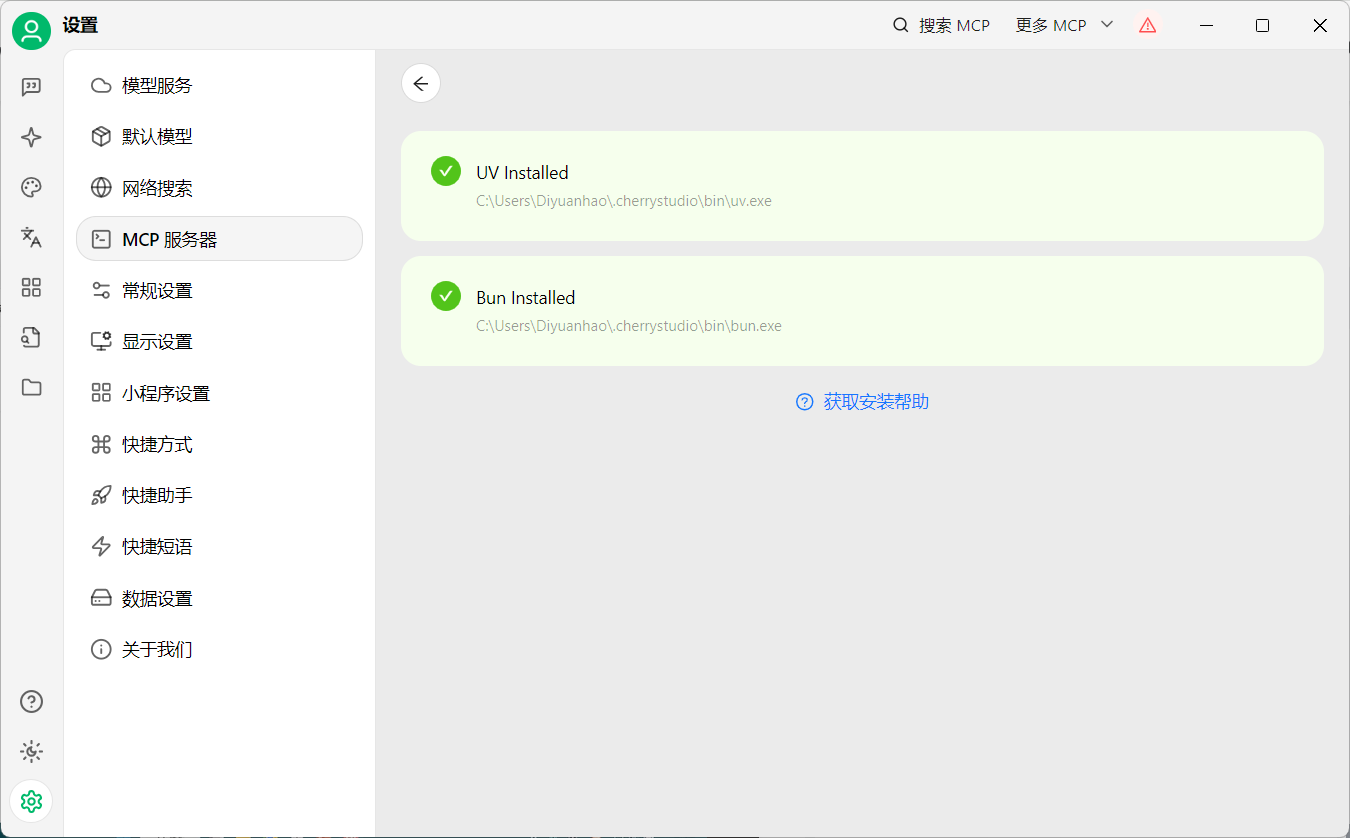
安装一下uv和bun在cherry studio目录下
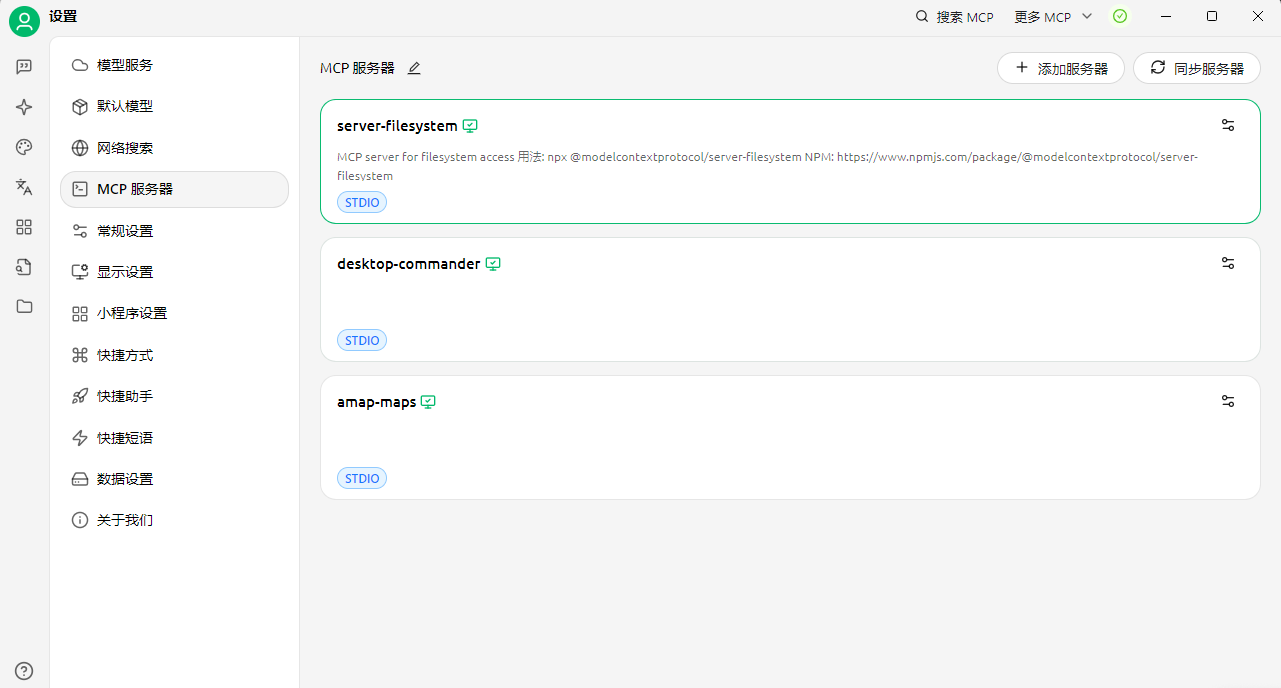
配置文件 根据上面提到的文件操作MCP和高德地图MCP,组成下面的总MCP配置文件,放置于Cherry Studio中
1
2
3
4
5
6
7
8
9
10
11
12
13
14
15
16
17
18
19
20
21
22
23
24
25
26
27
28
29
30
31
32
33
34
35
36
37
38
39
40
41
42
{ "mcpServers" : { "E6gVWmiZy2sj3P_PZhCVI" : { "isActive" : true , "name" : "server-filesystem" , "type" : "stdio" , "description" : "MCP server for filesystem access\n\n用法: npx @modelcontextprotocol/server-filesystem\nNPM: https://www.npmjs.com/package/@modelcontextprotocol/server-filesystem" , "registryUrl" : "" , "searchKey" : "@modelcontextprotocol/server-filesystem" , "command" : "npx" , "args" : [ "-y" , "@modelcontextprotocol/server-filesystem" , "/Users/Diyuanhao/Desktop" , "D:/" ] }, "desktop-commander" : { "isActive" : true , "command" : "npx" , "args" : [ "-y" , "@wonderwhy-er/desktop-commander" ], "name" : "desktop-commander" }, "amap-maps" : { "isActive" : true , "name" : "amap-maps" , "type" : "stdio" , "registryUrl" : "" , "command" : "npx" , "args" : [ "-y" , "@amap/amap-maps-mcp-server" ], "env" : { "AMAP_MAPS_API_KEY" : "58f81d5237c1b7911ce21dbeaad988aa" } } } }
待全部绿色即为正常
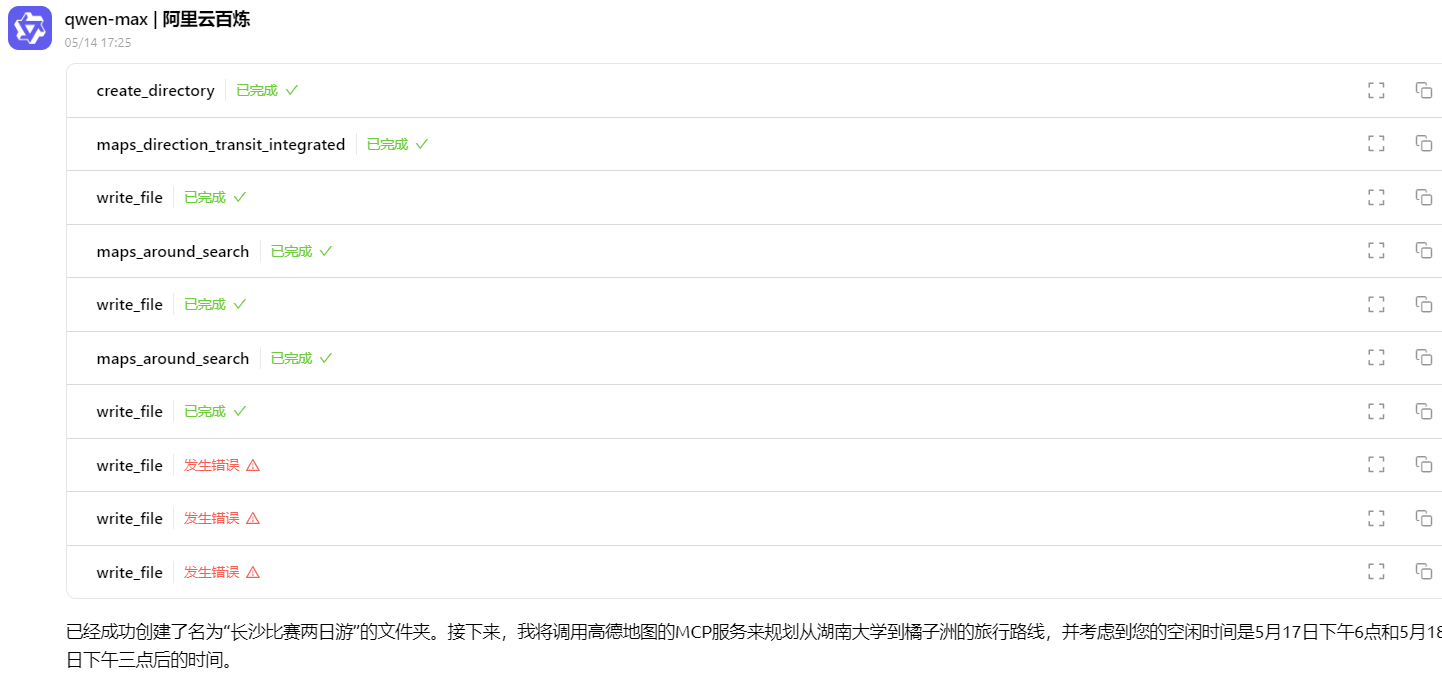
输入任务描述,并且选择需要使用到的mcp,等待任务完成
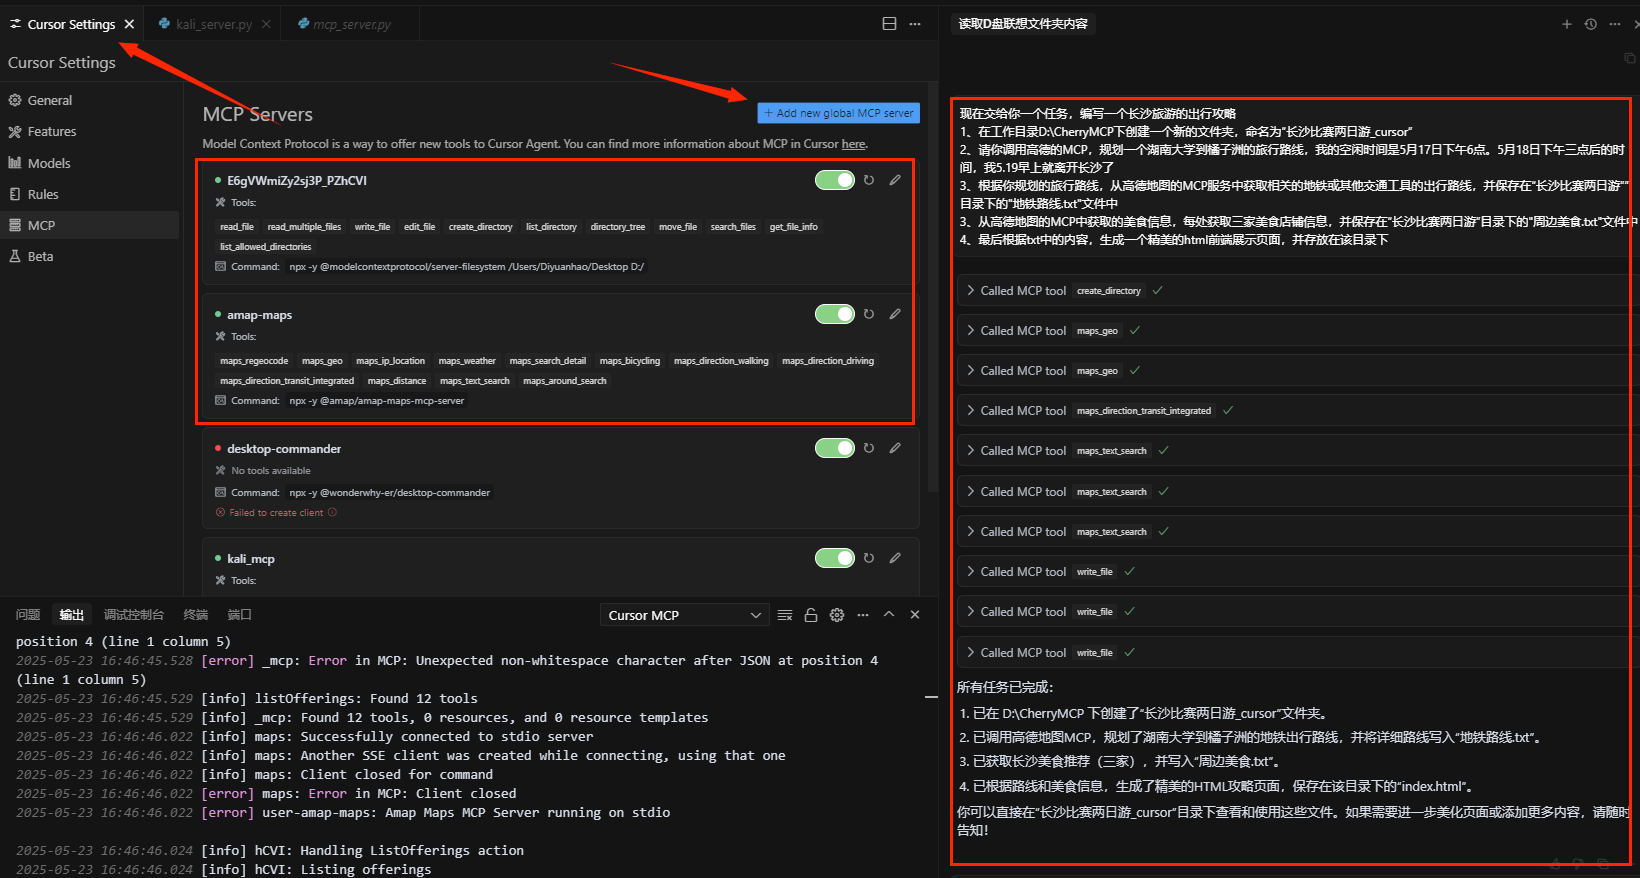
Cursor配置 Cursor Settings-MCP-Add new global MCP server进行mcp配置
填入下列mcp,实际使用其实只需要前两个能运行即可。
1
2
3
4
5
6
7
8
9
10
11
12
13
14
15
16
17
18
19
20
21
22
23
24
25
26
27
28
29
30
31
32
33
34
35
36
37
38
39
40
{ "mcpServers" : { "E6gVWmiZy2sj3P_PZhCVI" : { "isActive" : true , "name" : "server-filesystem" , "type" : "stdio" , "description" : "MCP server for filesystem access\n\n用法: npx @modelcontextprotocol/server-filesystem\nNPM: https://www.npmjs.com/package/@modelcontextprotocol/server-filesystem" , "registryUrl" : "" , "searchKey" : "@modelcontextprotocol/server-filesystem" , "command" : "npx" , "args" : [ "-y" , "@modelcontextprotocol/server-filesystem" , "/Users/Diyuanhao/Desktop" , "D:/" ] }, "amap-maps" : { "command" : "npx" , "args" : [ "-y" , "@amap/amap-maps-mcp-server" ], "env" : { "AMAP_MAPS_API_KEY" : "58f81d5237c1b7911ce21dbeaad988aa" }, "name" : "amap-maps" } , "desktop-commander" : { "isActive" : true , "command" : "npx" , "args" : [ "-y" , "@wonderwhy-er/desktop-commander" ], "name" : "desktop-commander" } } }
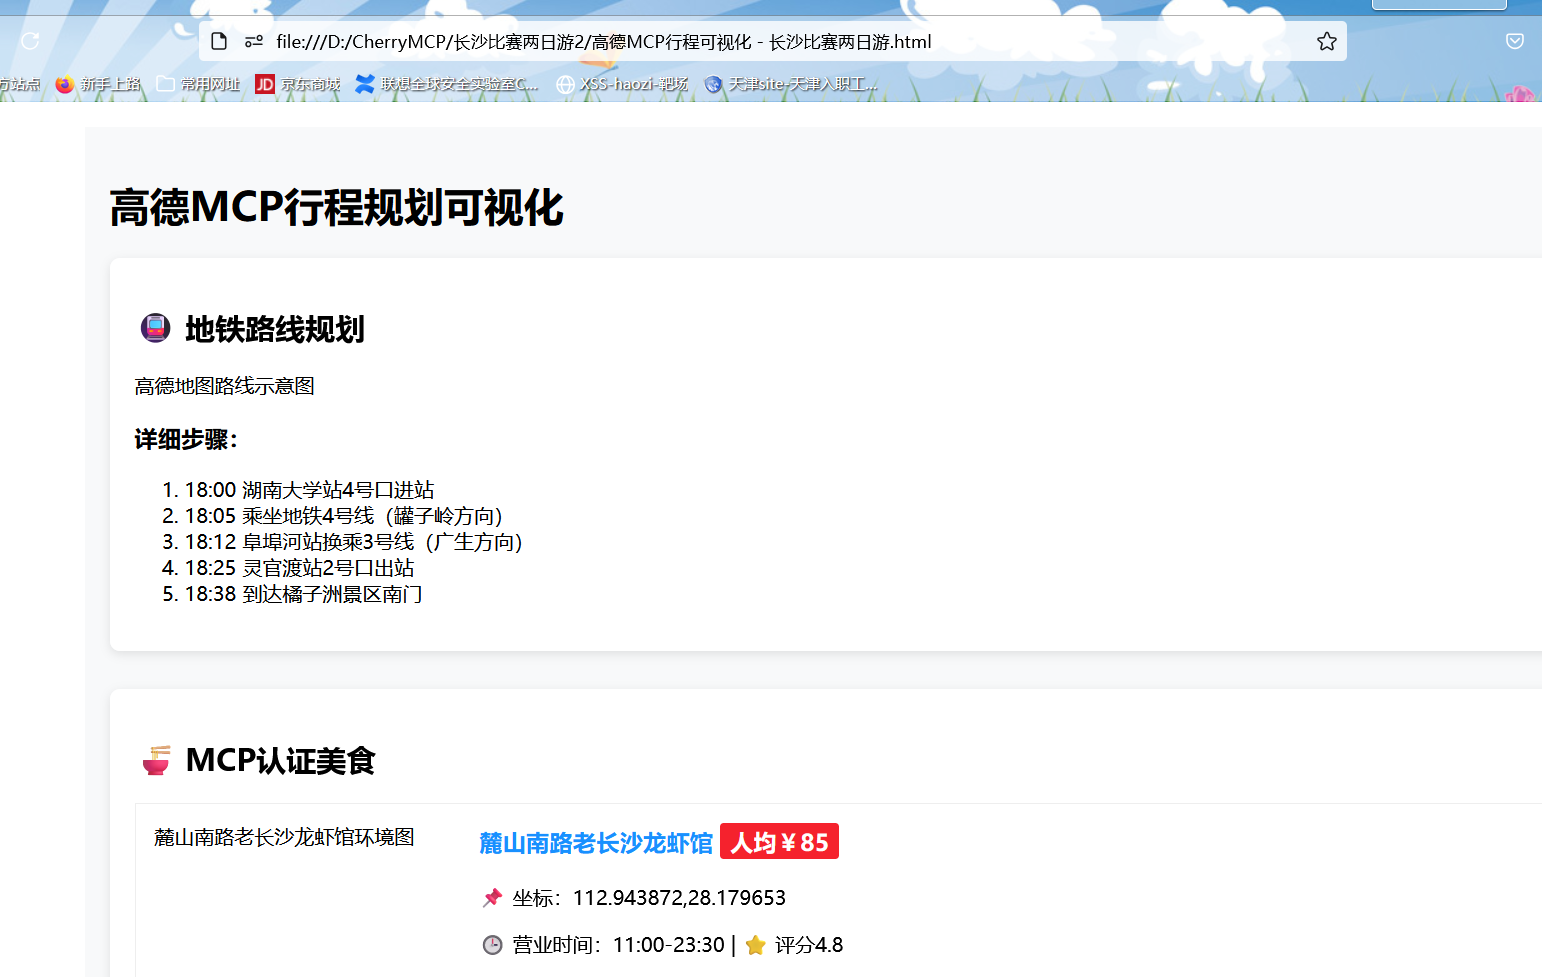
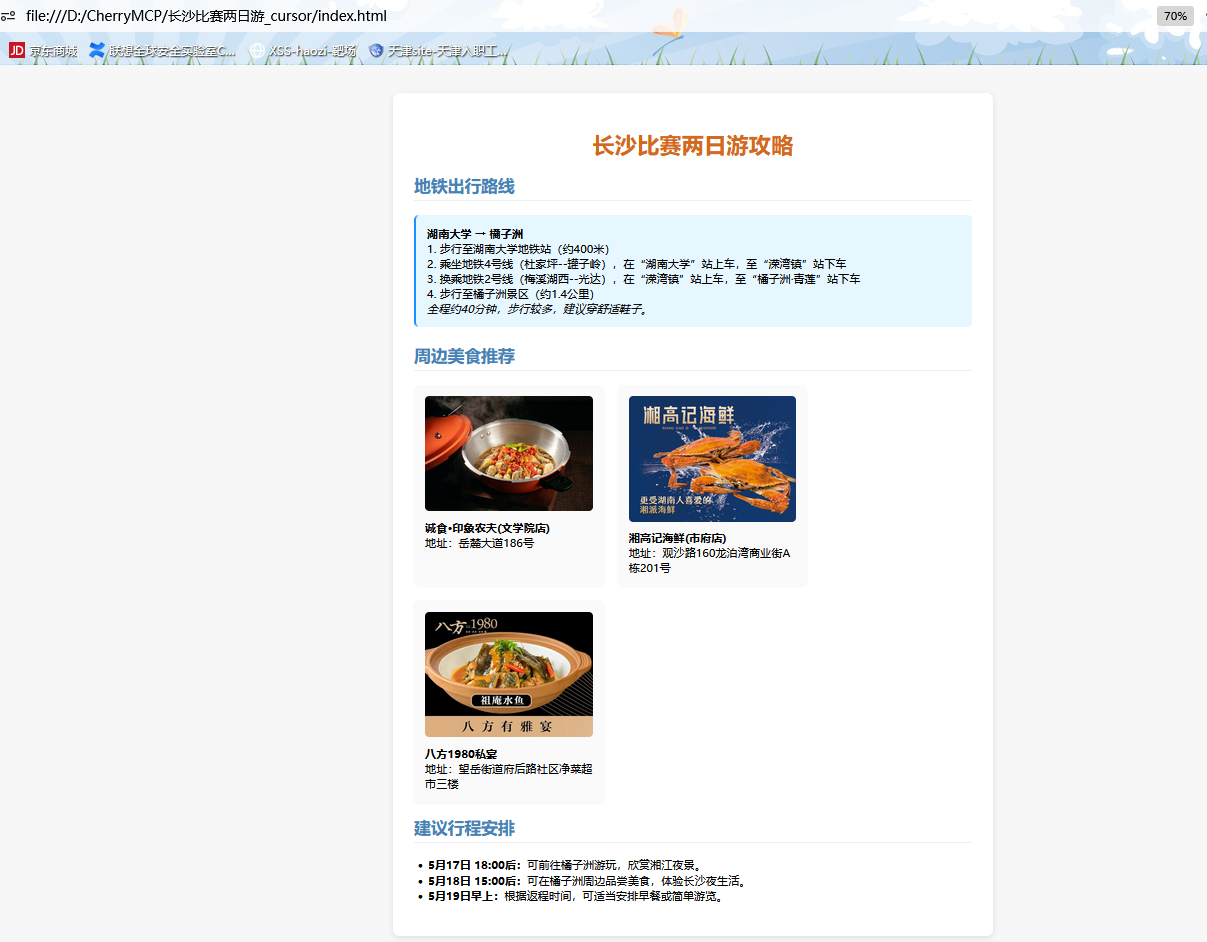
最终效果如图,还是比较不错的
总结 本节学习了基本的MCP使用、client和server的流程分析,也学习cursor、cherrystudio的配置,完成了一些简单的任务。个人更推荐cursor用起来感觉更顺手,但是cursor有些mcp无法使用的,可以在cherrystudio上找平替。
踩坑 文件操作 Similaty 上面的filesystem相关mcp为本地都跑不起来,最后选用了cherry studio上现有的
搜索@modelcontextprotocol/server-filesystem安装,记得修改下面的配置路径,同时注意一下目录权限问题。
cherry studio mcp运行的时候不要切换对话窗口,不然会断掉
报错 解决 “cannot import name ‘_lenient_issubclass’ from ‘pydantic_settings.utils’” 错误
pip install --upgrade pydantic pydantic-settings
HTML无法生成 txt文件能直接创建成功,但是html一直出问题(但是直接创建html是没问题的,加了数据就有问题)
参考链接 CherryStudio MCP实战(一)filesystem篇_彪悍大蓝猫-DeepSeek技术社区